Monday, August 24, 2009

Follow me


Follow me on over to a brand new blog. No mama drama If you enjoy photo editing and digital art you just might enjoy it. This is a place to show off your work, join in some challenges, make friends and have fun all without the drama that goes on in forums. The blog was started by dramafreemamas a.k.a. Ann. Yep, yours truly. A good friend, whom I met through a community type website (which shall remain nameless) loves to do edits. She was a group owner on the website and it was so much fun. But all good things come to an end, especially when there is drama involved. Well my friend decided to leave the community and I wasn't ready to stop having fun doing edits with her so I made her a nice friendly little place where we could get together. The way it's set up, the blog will accept up to 25 authors who can post artwork, and challenges. All others are welcome to play along and link us their work. I do hope you'll check us out and maybe even follow or request to be an author.

Sunday, August 23, 2009

Per request part 2

This post will cover how I did the pencil sketch photo for the layout. There are actually a few different ways to do this, in this case I chose the easiest...lol

1)first open the picture you want to apply the effect to


2) duplicate your picture.

3) In the effects palette choose photo effects (circled in red in the screen shot) then pencil sketch (indicated by the red arrow)
If you like the way it looks you can leave it at this. However, this is usually too light for me so I duplicated the pencil sketch layer, changed the blending mode to multiply then merged down. With some pictures I have done this step more than once, it just depends on the picture you are working with.
4) Now you should have your original photo, a duplicated layer and the pencil sketch layer. You can leave the pencil sketch layer as is or play around with different blending modes to get different looks. In my case I changed the blending mode to lighter color and then merged the sketch layer down to the color copy. You may want to try changing the blending mode to screen to add just a hint of color to the sketch.
5) At this point you can merge all your layers then save. (If you want to retain your original image be sure to save the file with a different name)
Hope you enjoyed my little tutorials today but mostly I hope they made sense....lol

Per request part 1

By request I'm going to attempt to explain how I did this layout.
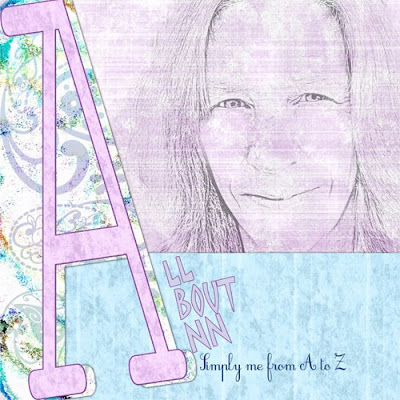

Sorry no screen shots with this but I always seem to have a hard time doing those. I know how but get frustrated trying to get them right....lol

1) I started with a blank canvas in photoshop elements sized at 12x12 (3600px x 3600px) resolution 300 (as a side note when I resize to post here I size the canvas at 500px x 500px with a resolution of 72)

2) I added my background paper which was the pinkish purplish colored paper

3) I then layered on a second paper (the blue one) Since I didn't want it to cover the entire canvas I used the rectangular marquee tool to select the top portion of the paer and then hit delete, leaving only the bottom part of the paper showing.

4) A third paper was added on top of that (in this case, the paisley paper). I left this covering the entire canvas for the time being.

5) With the type tool, I typed the letter A, choosing a font that suited my taste, then resized the letter to span the entire page top to bottom. Once I was satisfied I simplified the layer.

6) My next step, to make the letter stand out a bit more was to add a stroke outline to the letter.
There are 2 ways you can do this
a) you can go to Edit > stroke outline > then enter the size, color, and placement of the outline.
OR
b) control + click on the thumbnail in the layers palette which will load the selection of the layer. Add a new blank layer above and then repeat the same procedure as above. This way you have your outline separated from the actual letter and you can then add a bevel, texture or whatever you choose. (this is the method I prefer to use most of the time). When you are satisfied with the outline you can then merge the layer down.

7) Now to cut away part of that paisley paper. On the letter layer, using the magic wand tool, I clicked on the canvas to the right of the letter which selected only that part of the canvas. Move to the paisley paper layer and hit the delete key to remove that portion of the paper. I then went back to the letter layer and moved it slightly to the left.

8) I wanted my letter to match my background paper. I duplicated layer 1 (the background paper) and moved it above the letter layer. I then hit control + G to clip the paper to the letter, then control + E to merge it down.

9) Finally I added my photo. I used a soft edge eraser with a lowered opacity of about 40-50 and erased around the edged of the photo to make it blend in better. I also erased lightly inside the photo to get rid of some of the harsh lines since it was a pencil sketch. Finally I lowered the opacity of the photo until I liked the way it looked.

I didn't include in the tutorial about adding drop shadows, but I did add those to the layout as well. Maybe how I do drop shadows will be a whole other tutorial.

If you want to know how I did the pencil sketch I'll add another post "Per request part 2"

Saturday, August 22, 2009

Day of Discovery

Please bear with me if I get a little long winded here today. I've made quite a few discoveries in the past couple days.
1. People are watching whether you know it or not. Namely J a.k.a. Joyce. I discovered while at the funeral home last night that a comment left by "J" on a previous post was actually my wonderful cousin.
2. You can teach an old dog new tricks. I sat down and figured out how to do a 3 column template for a blog. What? I still only have 2 columns? Well I know that. I didn't say I did it for this blog. I started a new one. Right now there's really not much there, it's just a work in progress. I suppose if you want to know more about it you can check out my profile. I started it under an entirely new account so I'm listed as a team member (or whatever you call it)
3. Even when I think my stuff is junk, there may be someone out there who likes it and appreciates it....lol
4. I have not been a very good blogger. To my wonderful followers who are also EC members, please accept my apologies. I meant to add each of my EC followers to my favorites. Several of you slipped through the cracks in my brain and so may not have been getting drops from me. I fixed it tonight, added each of you to my favorites and those are the first drops I do each day.

Now I have a freebie for you. It's a hodge podge collection of stuff that I threw together. Three of the papers that I used for my "A" page are included in this mini kit.

If you would like the mini kit you can download it HERE
Finally per request I also have step by step directions for how I did my last layout. Since it's getting late though, I will be back with that tomorrow.
Related Posts with Thumbnails