Showing posts with label digital scrapbooking. Show all posts

Tuesday, February 2, 2010

Negative dogs and talking trees

After a long day of work I come home hoping that my beloved best friend will do me the favor of taking over the posting duties for the evening. Apparently I was asking a bit too much. When I asked him his reply was very negative.
 
Alrighty then, I'll just go to plan B.
I've had this thought rolling around in my brain for a while and finally got it done. I took phrases like barking up the wrong tree, going out on a limb and branching out, and turned them into this.


I started with a basic tree shape. Then I typed out the phrases and rotated, resized and distorted them to follow the shapes of the branches. After that I threw away the tree shape and just started adding in color for the leaves.
Since I haven't had any type of freebie up in quite some time this was a good opportunity to do so. 


These are all PNG files so you can place them on anything without having to try and get rid of a background. You get one that I've already colored, one that is black and white that you can add a color layer over top of and one that is just the branches. Hope that someone can find some use for them. 

OOPS it would help if I added the link for the download wouldn't it? Good thing I decided to take one last look at the post after I hit the publish button.
You can dowload the zip file by clicking HERE

Wednesday, December 2, 2009

Your turn

I consulted with my blog partner Duke on what we should post about today. We decided that since I gave myself a gift yesterday, today I should give one to you. Duke thought that this was a tail wagging idea.
Since this is a gift we aren't going to actually show you what it is. Half the fun of opening a gift is the anticipation of what's inside right? Ok so maybe not, but that's the way we're doing it anyway. I will tell you that there are 15 things in this package.
If you would like to take advantage of this and open an early gift from me and Duke you can pick it up right HERE
I've actually been meaning to do this for several days now but never could find the time to upload the file because I was too busy with the darn dropping.

Monday, November 9, 2009

Positively negative

EXACTLY!

I'm sure that makes no sense whatsoever but that's OK because neither does anything else.
I started my rounds on all your wonderful blogs today and managed to read and comment on about the first three or four. After that, I only read. I'm afraid that I just don't have it in me today to do all the comments. I promise I will get back to my regular routine, just not today.

Now I've got something to give you. This is one of those things that at the time seemed really cool when I was doing it, and maybe it is. But, in my current state, I'm just not seeing it anymore...lol I don't know if you would consider this an overlay or more of a template. I'll try to explain how I used them without being too confusing. Each overlay/template/whatever it is consists of shapes in 3 different colors (white, gray, black) First I selected just the black and then added one color to that, then I did the same with each of the other colors. Maybe you can get the idea of what I just said by the example in the preview.


The download I have for you today has eleven of these thing a ma jigs and three actual papers that I made using them. Being the total ditz that I am none of the papers that are shown in the preview are included. I guess after I did them I deleted them because I can't find them anywhere.
I think maybe I should just go to bed now and try again tomorrow.
Oh DUH!!!!!!!!!!! I guess you might want the link for the whosey whatsits huh? Download it right HERE


FYI spell check seems to have a problem with the word whosey but not whatsits. Go figure.

Sunday, October 25, 2009

It's time for "that reminds me"

Remember last Sunday when I posted a picture and told you how it reminded me of one of YOU? Well, it's time for another one. Bet you thought I forgot about it didn't you? I used several combinations of your numbers that you gave me last time until I finally found a picture that jumped out and said "Hey, that reminds me of..."
This weeks picture reminds me of Kat from Candles crafts and whatnot.

Out of sheer boredom one day I took the picture of this building. When I came across it in the files and noticed the sign it reminded of the post Kat did about her chiropractor visit. You can read that post here if you missed it. Hopefully she has her computer problems taken care of and she'll catch this post.

WAIT! don't go away yet. There's more. Yesterday I showed you the fun I was having playing with the halftone pattern and said that I would put together a download for you. Believe it or not, I actually managed to get it done. I'm still feeling a little soggy from my life as a fire hydrant but that's no excuse to let you down. So here it is. I've include 2 papers and one overlay.


Go ahead and grab that download right HERE

So that's all there is for today. Have a wonderful Sunday.

Wednesday, October 7, 2009

The climb

If you aren't familiar with the song "The Climb" by Miley Cyrus I strongly recommend that you listen to it. I absolutely love the song and I think in a way it almost sums up my life in some ways. I wanted to post a you tube video of the song but I'm afraid that I just can not figure out how to do it. So if anyone wants to take pity on a poor middle aged scrappy blogger and give me a clue I would be forever in your debt....lol

Now, if you'll pardon me while I softly hum the song, I'll continue with the rest of today's post. I actually have another freebie for you. This is a quick layout I put together. I just threw the picture in since it was the first fall looking picture I could find.

I started with the embossed papers that I made a while back. You can find those at this post http://annssnapeditscrap.blogspot.com/2009/09/fall-is-in-air.html
Then I made the wreath and the happy harvest wood sign. I added a bow that was an extraction from a picture I took. I also made the tape frame. I saw something like that somewhere else and liked the way it looked. Any way, I put it all together and made a quick page for you. I also threw in the wreath, a happy harvest sign as well as a blank one and the tape frame. If you want the papers and haven't gotten them you can go to the link above. If you like this little freebie you can get it right HERE
One thing I want to mention before I go. I know there are some of you who don't do scrapbooking and so you may think that you wouldn't have any use for these freebies. They may be more useful than you think. Any of the elements can be used just like you would use any clip art you may have. Have you ever made a greeting card on your computer? Well you can use digital scrapbooking stuff to make your cards with. Really anything that you do with other clip art you can also do with this stuff. Just some food for thought.
Well it's off to do some dropping before I call it a night. Have a good one everyone.

Thursday, October 1, 2009

It's been ages

How long has it been anyway since I offered you a freebie? I'm afraid to look back and see when the last time was.
I started this the other day as a distraction from the pictures when I was getting frustrated. Tonight, since there is nothing else to do I put it all together for you. I made the dot overlay first. Then I put a plain color underneath, added a contrasting color to just the dots, used blending modes, duplicated the dot layer, rotated it then played with the blending modes again. I finally ended up with the paper you see in the preview.


What I'm giving you today is the dot overlay and the paper. You can use the paper or see what kind of combinations you can come up with using the overlay. Have fun be creative. You can grab the download right HERE

I can hardly wait till the weekend, which does officially start tomorrow at 2:30. I've got all this time on my hands now. What will I do?

Just a note before I go. When I was doing my drops tonight I had a problem trying to get to a few blogs. There were 3 of them and I don't remember which ones other than one was Grampy's. When I clicked on the widgets it kept going to a search results page. Did anyone else have this problem? I tried several times to go back and always got the same thing. I even tried going to Grampy's blog through the comment section on mine. Still same thing. All the other ones worked fine though. Sure would like to know what was going on with that.

I don't have time tonight, but tomorrow I'll be bringing you my top ten droppers for September.
Have a great night.

Saturday, September 12, 2009

You get a D

That's right, I'm giving you a "D". Template that is. I finished the next page of my A to Z project.

I did this one slightly different than the other ones. I decided that I really didn't want the letter to always be so large. To make the one paper for this layout, I took a screen shot of one of my blog posts. I opened it up in photoshop elements and then cropped a section of the text. Then I duplicated it several times, rotated the layers in different directions and finally added a gradient layer on top.
So this is the template that I'm giving you today.

But wait! There's more. I've also included the text paper, the ribbon and the element that I used in my layout. Not enough? OK, fine, I'll also throw in my layout, minus the picture of me. Today, you get all this for the low low price of free. Now you can't beat that. What are you waiting for? Click right HERE to grab it

Friday, September 11, 2009

Fall is in the air

The evenings here have been getting quite cool lately. I can feel fall in the air. I'm not quite ready to say good bye to summer just yet but I have no choice. Even though I am a fan of warm sunny weather I do appreciate the beautiful colors that come with fall. I've actually spotted a few trees already that are changing colors.
Last night I was doing some playing in photoshop elements and came up with a little fall gift for you. In the download you'll find three fall colored papers with an embossed look to them. I've also included 2 overlays that I used to make the papers. You can try them out on plain or patterned papers, try out different blending modes and see what you come up with.

Grab your gift right HERE.
Now, since it's Friday and the air is a bit on the cool side I'm going to practice my hibernating skills for the weekend. I'm going to need all the rest I can get this weekend because next week is our local fair. That is always a crazy week for me at work and I'm sure that this year is going to be like all the others.

Tuesday, September 8, 2009

Wow

You guys have really just been making my day with all your wonderful and kind comments. When I first started blogging (almost a year ago) I wondered if anyone would ever read this besides me. I know my husband and kids have absolutely no interest in what's here at all. I never imagined that I would have as many followers as I do today. Most of you I've come in contact with through Entrecard, and for that I am very grateful.

I was going to try and respond to all your comments to my last post in the comment section but I'm never really sure if anyone ever goes back and reads those or not. The majority of the comments had to do with digital scrapbooking and how to get started. I've put together a few links for you that should help you on your way.
First of all if you are looking for freebies, you can start right here :) Check the categories section on my blog to find what you are looking for. I have kits, templates, word art and other assorted stuff. Click on freebies and it will give you all the posts that offer freebies.
Two other places for great freebies come from
http://digivic.blogspot.com/ and
http://censloft.blogspot.com
Not only do these two ladies offer beautiful freebies but they are a couple of the nicest bloggers I know.

for tutorials you can try
http://www.scrapbook-bytes.com/a-tuts/publish/index.shtml
http://www.gottapixel.net/blog/?page_id=310
http://scrapbooking.about.com/

These are of course only a few to get you started. If you can't find what you're looking for you can do a search using the keywords "digital scrapbooking tutorials, or digital scrapbooking freebies"

For those of you who have done traditional scrapbooking but never tried digital all I can say is that it's much cheaper and a whole lot less clean up. Not to mention that in digital, if you cut a piece of paper the wrong size or shape there's is nothing lost because there is always the "undo".
Now you don't get that with traditional....lol

Have a great night everyone. Hopefully I'll be back with some goodies for you soon.

Monday, September 7, 2009

An answer and a surprise

There was a comment left on my last post that I want to address today. The comment was "I have a really stupid question and I hope you don't mind me asking, but what do you exactly do in scrapbooking? It does look interesting."
First of all, not a stupid question at all, and second, of course I don't mind you asking. Now to answer it I didn't know if I could explain it so that it would make sense so I went in search of an intelligent answer. You see sometimes, even though my brain knows the answer, when I put it into words it loses something on the journey from thought to text.
So, this is the definition that I found for scrapbooking:
Scrapbooking is a method for preserving personal and family history in the form of photographs, printed media, and memorabilia contained in decorated albums, or scrapbooks.

I also found an explanation of what digital scrapbooking is on Wise Geek

Now that you endured my feeble attempt at explaining scrapbooking I have a surprise for you. When I was doing my EC drops yesterday I saw an adorable make up bag on LovelyPurses The fabric it was made from had the cutest little trees on it and it inspired me to go make some of my own. I've included one layered template and 5 sample trees.
You can get them right HERE

Well back to work tomorrow, at least it's only a 4 day work week. Hope everyone is enjoying their Labor day weekend.

Sunday, September 6, 2009

It's been awhile

Wow! When was the last time I did a scrapbook page or offered you a freebie? Today I started working on quite a few different projects, digital and otherwise, and managed to finish at least one. I haven't worked on my A to Z project in a while so I opened it up and set my mind on completing it.


Here's the template I made for you to use. You can download it HERE

I wanted to let you all know that the crazy lady came back last night again. She baked cookies. Since I woke up this morning I haven't seen one sign of her. Now I kind of miss her because I had to do the dishes myself.
Today I pretty much just enjoyed the fact that the sun was shining and even though it's Sunday I DON'T have to go to work tomorrow. I tried to work on my frosting container projects but didn't get very far. I have three of them finished and 3 more almost. Maybe I'll take some more pictures of those tomorrow to show you. That about sums up my day, how is your weekend going?

Saturday, September 5, 2009

Drop shadows

I had said some time ago that I would do a tutorial on drop shadows and I finally got around to making good on that promise.

You'll have to excuse the horrible screen shots. For some reason I can never get them to look very good. Hopefully you'll be able to get the idea of what I'm talking about here though.


Lets start with why you need them. If you just layer pictures and elements on a background paper all you are going to end up with is a flat image. When you add drop shadows to the layers it gives it some dimension and adds a touch of realism to it.


I'm going to show you two different ways that you can add a drop shadow. (done in photoshop elements 7)

The first is the easiest way, however, it doesn't give you as much flexability.


Make sure that you have selected the layer that you want to add the drop shadow to.

Go to the effects palette and choose layer styles (indicated by the circle at the top of the screen shot) then from the drop down menu choose drop shadows.

For the example I chose the one indicated by the arrow.
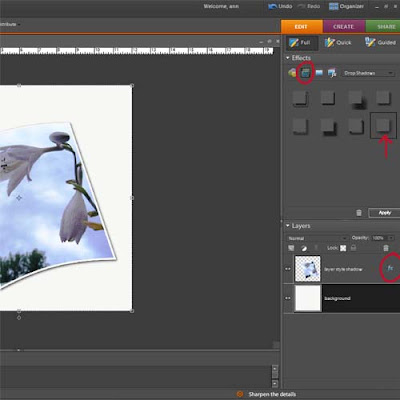


Notice the circle at the bottom of the screen shot. If you double click on that a window will pop up that allows you to adjust the shadow. You will be able to adjust the angle, size, distance, opacity and color. The next picture is what you will end up with.
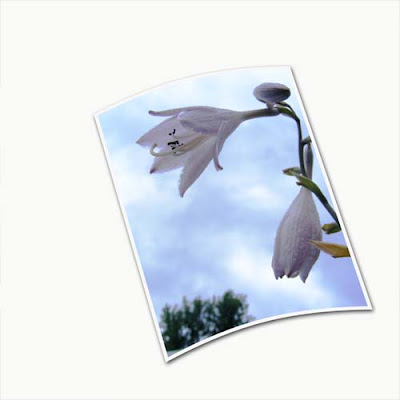


That's not so bad looking, but there's nothing more I can really do with it.


Here is another method that allows you more flexability because it puts the drop shadow of it's own layer.
In the screen shot below notice the red circle. While holding down the control key click your mouse in the area indicated by the circle. This would of course be on the layer of the object you want to add the shadow to. Notice the marching ants around that object now.
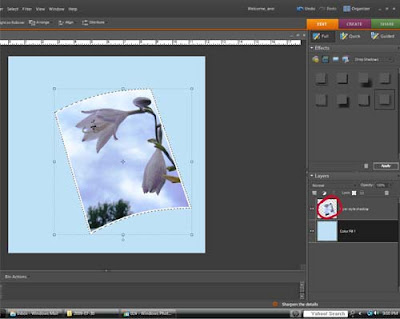

Now that you have the selection loaded add a blank layer below that layer.
Next go to select > feather and enter a value. (I usually choose 10)

Hit the letter D on your keyboard to set the colors to default and with the paint bucket tool selected fill the selection with black on the blank layer. You now have a drop shadow below your object.
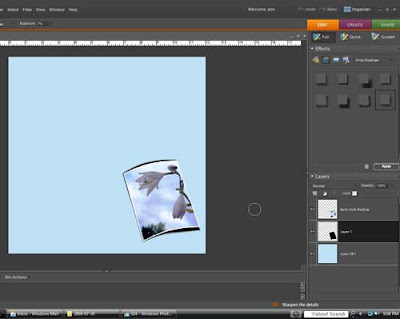

(I should mention here that the picture in the screen shot wasn't how it looked at first. I played with it a little and forgot to leave it the way it originally looked. OOPS)

This is what you can do with you drop shadow now.
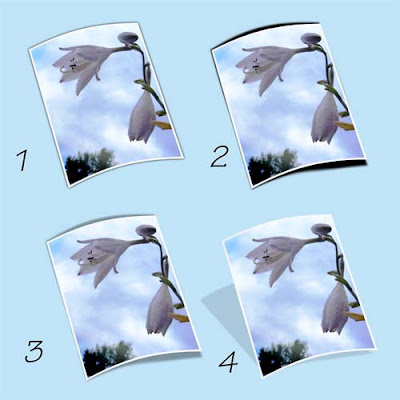

Image 1 is how it will look if you follow all the above steps. It pretty much looks about the same as it did using the first method.

Image 2 I used the smudge tool to drag the shadow out slightly

Image 3 this is the same as 2 but with a lowered opacity. I think I took it down to about 25%

Image 4 For this one while holding down the control key I dragged the corners of the shadow out which gave it the appearance of being farther away from the background page.


Now that you know how to do it, go out and cast some shadows.

Thursday, August 27, 2009

Can't stay focused

I have the worst habit of starting projects, getting side tracked and starting another. Before you know it there's a pile of things waiting to be worked on and finished.
I have way too many pictures waiting to be edited.
I now have the second blog that I want to pay attention to.
I've got frosting containers to decorate.
I have a bag of yarn that has been sitting for over a year waiting to be made into an afghan.
There is a box of assorted unfinished craft projects sitting in my basement.
Then of course there is also my plan for the A to Z layouts.
I did manage to finish B tonight


And here's the template. I'm sure that I could have done better on this one. Maybe my heart just wasn't in it this time.
The download is HERE

Hope everyone is having a great night.

Sunday, August 23, 2009

Per request part 1

By request I'm going to attempt to explain how I did this layout.


Sorry no screen shots with this but I always seem to have a hard time doing those. I know how but get frustrated trying to get them right....lol

1) I started with a blank canvas in photoshop elements sized at 12x12 (3600px x 3600px) resolution 300 (as a side note when I resize to post here I size the canvas at 500px x 500px with a resolution of 72)

2) I added my background paper which was the pinkish purplish colored paper

3) I then layered on a second paper (the blue one) Since I didn't want it to cover the entire canvas I used the rectangular marquee tool to select the top portion of the paer and then hit delete, leaving only the bottom part of the paper showing.

4) A third paper was added on top of that (in this case, the paisley paper). I left this covering the entire canvas for the time being.

5) With the type tool, I typed the letter A, choosing a font that suited my taste, then resized the letter to span the entire page top to bottom. Once I was satisfied I simplified the layer.

6) My next step, to make the letter stand out a bit more was to add a stroke outline to the letter.
There are 2 ways you can do this
a) you can go to Edit > stroke outline > then enter the size, color, and placement of the outline.
OR
b) control + click on the thumbnail in the layers palette which will load the selection of the layer. Add a new blank layer above and then repeat the same procedure as above. This way you have your outline separated from the actual letter and you can then add a bevel, texture or whatever you choose. (this is the method I prefer to use most of the time). When you are satisfied with the outline you can then merge the layer down.

7) Now to cut away part of that paisley paper. On the letter layer, using the magic wand tool, I clicked on the canvas to the right of the letter which selected only that part of the canvas. Move to the paisley paper layer and hit the delete key to remove that portion of the paper. I then went back to the letter layer and moved it slightly to the left.

8) I wanted my letter to match my background paper. I duplicated layer 1 (the background paper) and moved it above the letter layer. I then hit control + G to clip the paper to the letter, then control + E to merge it down.

9) Finally I added my photo. I used a soft edge eraser with a lowered opacity of about 40-50 and erased around the edged of the photo to make it blend in better. I also erased lightly inside the photo to get rid of some of the harsh lines since it was a pencil sketch. Finally I lowered the opacity of the photo until I liked the way it looked.

I didn't include in the tutorial about adding drop shadows, but I did add those to the layout as well. Maybe how I do drop shadows will be a whole other tutorial.

If you want to know how I did the pencil sketch I'll add another post "Per request part 2"

Saturday, August 22, 2009

Day of Discovery

Please bear with me if I get a little long winded here today. I've made quite a few discoveries in the past couple days.
1. People are watching whether you know it or not. Namely J a.k.a. Joyce. I discovered while at the funeral home last night that a comment left by "J" on a previous post was actually my wonderful cousin.
2. You can teach an old dog new tricks. I sat down and figured out how to do a 3 column template for a blog. What? I still only have 2 columns? Well I know that. I didn't say I did it for this blog. I started a new one. Right now there's really not much there, it's just a work in progress. I suppose if you want to know more about it you can check out my profile. I started it under an entirely new account so I'm listed as a team member (or whatever you call it)
3. Even when I think my stuff is junk, there may be someone out there who likes it and appreciates it....lol
4. I have not been a very good blogger. To my wonderful followers who are also EC members, please accept my apologies. I meant to add each of my EC followers to my favorites. Several of you slipped through the cracks in my brain and so may not have been getting drops from me. I fixed it tonight, added each of you to my favorites and those are the first drops I do each day.

Now I have a freebie for you. It's a hodge podge collection of stuff that I threw together. Three of the papers that I used for my "A" page are included in this mini kit.

If you would like the mini kit you can download it HERE
Finally per request I also have step by step directions for how I did my last layout. Since it's getting late though, I will be back with that tomorrow.

Thursday, August 20, 2009

from A to Z

Before I get to the point of this post I want to thank everyone for all the comments to my last post. Your kind words, thoughts, sentiments and prayers are so very much appreciated.

Now on to today's post. I came up with a project that I'm going to call "Simply me from A to Z" To explain: I'm going to do a page for each letter of the alphabet. This is sort of a discover yourself through the alphabet kind of thing. Starting with the letter A which in my case is my name and so becomes my title page. Each letter will be used to describe or explore something about myself. The subject of each page will correspond to the pages letter. I would love it if anyone else out there wants to play along. You don't have to it with scrapbooking it can be in pictures, drawings, journaling or whatever you choose. You can do this project as fast or as slow as you choose. Take one letter a week or do the whole alphabet in one sitting. Your choice. If you want to play along leave a comment here so that I can check out what you come up with.
this is my first page.


And since I haven't done any freebies in awhile, I decided that I would make templates out of each of my layouts.

So if you would like to use my template you can grab it right HERE

Monday, August 17, 2009

Did you ever have one of those days?

One of those days where you could just kick yourself in the butt? Well I had one yesterday. We went to the Medieval fair and it was great. The weather was fantastic, a little on the hot side, but then I'm a big fan of heat. I pulled out my camera and hung it around my neck because I planned on loading the memory card. I came home with a total of 11 pictures. No I don't have a really small memory card. I got the first 11 pictures and then the next time I went to turn my camera on it turned right back off. I tried a couple times and nothing. Guess what else? I DIDN'T BRING THE EXTRA BATTERIES. (pause while I kick myself a couple times). To make matters even worse, (yes it gets worse) when I got back home and tried the camera, it turned back on no problem. The batteries were fine. Apparently, the problem was with the idiot working the camera. (kick, kick)
Enough whining here's a few of what I got.
This guy was the first show we watched. He was doing tricks with a whip and he was hysterical. Here he was climbing the ladder with the underwear around his ankles. He went all the way to the top and stayed there for 3 minutes. The ladder wasn't being held up by anything but him.

Just a random picture I took.

And another one. I just liked the way these 2 looked sitting there on the bench.

This is the entrance.

These 2 are Wade. I can't believe I got him to do this. If he knew they would end up on my blog he probably never would have agreed to it. He took one of me here too, or so he thought. I did pose with my face in the hole but when I got home, it wasn't on the camera. Guess he pushed the wrong button or something.
Now just a layout to finish off the post. Totally unrelated to the Medieval Fair but I've got it so here it is. I used a kit by Elisa Holt from http://elisasbits.blogspot.com/ The kit is called "Fresh and Fun"
OK so it's off to go float in the pool some more since it's still 90 degrees outside.

Monday, August 10, 2009

The incomplete file

I have a folder on my computer labeled "PSD files incomplete" This is where I store all the projects that I've started but never quite finished. Right now there are 10 files in that folder. Some of them I think I should probably just delete and mark them off as a lost cause, but....
Seeing as how I don't seem to have any new inspiring thoughts floating around in my head, I dug into the incomplete file. I am determined to clean it out. After this post I'll be down to 9 files. I still had the psd file from miss kitty so I made a template for you. I also colored a few of them and threw them in there too. On top of that I threw in a kitty patterned paper and wavy edge mat. If you would like Miss Kitty you can download her right HERE

Tuesday, July 28, 2009

The fog has lifted

I feel like I've been in a complete fog for the last several days. I haven't wanted to do anything but lay around and sleep. Today I finally feel like the fog has lifted and have a little bit more energy, YEAH!
To share a couple edits with you. This first one was a picture I took of one of those plastic outdoor chairs. The chair is just a plain off white sort of color. I added a blank layer over the original picture and colored in the roses. Then I just played with different blending modes till I liked the way it looked.


Just a random picture I took when we were at the last concert in the park. Mainly all I did was crop the picture, clone out a coke bottle and a persons butt, then messed around with levels and color curves.


I also did a couple layouts. I had that song "I never promised you a rose garden" stuck in my head. I'm not sure if that's the title to the song but maybe you know which one I mean. Anyway, I took the edit I did of the chair and used it as an overlay for the top of the page. I used the words from the song to put on the page of the book and dug up a picture from our wedding. Not your typical wedding layout, but then I'm not necessarily your typical scrapper.


Here's another one. I used pictures from my walk at a nature trail I visited as overlays on both papers.


Of course I made a template of the last layout for you.


But, I also added in all the things I used for both layouts.

Friday, July 24, 2009

Funny Friday

I have to start off by sharing a comment left on my post about the fruit flys. J said "You'll like this solution:Drink 7/8's of a bottle of wine.Leave the open bottle with the remaining wine on the counter. Every so often shake the wine bottle and drown the buggers that are licking the inside of the bottle! (Just remember ya can't suck down the last of the wine...) A dark colored bottle makes it a bit more attractive! "
Thank you J for the suggestion, I may just have to try it. I also loved the reminder about not sucking down the rest of the wine...lol I would have left you a comment elsewhere but your blogger profile is set to private.

OK, so on with the rest of the post. Here's a layout I did last night. I used another one of June's great kits from http://censloft.blogspot.com/ The kit is called "Everyone" because indeed, you can use this kit for everyone. Great for scrapping those less than frilly pages.


I did something I haven't done in a long time. I sat down and made a wish list. Sort of like those Christmas lists you make every year when you are a kid and want it all. For years now, whenever someone has asked me what I want for birthday or holiday I always say nothing. Truth is there are things I would like to have but they are always things out of price range for the person asking. So just for fun (or out of boredom) I thought of a few things that I've been wanting to get. Just as soon as the old bank account says I can here's what I'll be getting.


Last but not least I have a little something for you. Rather than the typical 12 x 12 template, I decided to do several 4 x 6 templates that can be used for making brag books. There are 5 templates included in the download.


Hope you like them. Grab them right HERE
Related Posts with Thumbnails