Monday, December 29, 2008

just sharing

Just sharing a 2 page layout I did from the pictures I took at work the day we had our employee gift exchange and pig out. Strange name but that's what everyone has called it for as long as I've been there which is over 10 years. Every year we draw names and on the day we pick to exchange gifts everyone brings in a dish to share. We set it up in the back room and everyone either grabs something on break, lunch or just in passing. The owners always chip in pop and meat and cheese for sandwiches. Normally it's a day when some of us do more goofing off than working. Of course that wouldn't be me....lol (ok so I may be the biggest offender)


I used my own kit "This the season" and a template from http://www.bannerwoman.com/

Worth the money

Saturday I went shopping and bought something that I just had to share with you. Now how do I do this and make it relevant to my blog? I take a picture of it of course. To make it fit in just a little more I did and edit on the picture. I could make a scrap book page out of the picture but I think that would be taking it just a little bit too far.

This time of year I have such a problem with dry skin it makes me crazy. I was browsing through the Bath and Body works website one day and found this product.


When I was at the mall, I picked some up. The price was a little high ($18) but I'm going to say that it is definitely worth the money. I was scratching myself silly, to the point that I had raw skin in some places. I used this once and barely itched at all. If you want to check it out here is the link http://www.bathandbodyworks.com/category/index.jsp?categoryId=3240946&cp=2484525

Sunday, December 28, 2008

Today I have a present for you. I came up with a little kit for New Years.


You can find the download for the freebie HERE

Just in case I take another long break from blogging, I'll wish everyone a safe and happy New Year now.

Saturday, December 27, 2008

How did that happen?

I can't believe that I haven't posted anything in almost 10 days. How the heck did that happen? It isn't because of a lack of material or too many social engagements keeping me busy. I can't even go with the excuse that I had just too many things to take care of to prepare for the holiday. I'm just going to have to go with the truth here, I've been lazy.
In an attempt to get back in the swing of things here, I'll start off with posting some of my Christmas pictures/edits.

The first two here are pictures that I took at a local amusement park. They had a light display set up throughout the park and a tree display inside a hotel that's there. I have to say that I was very disappointed with all of the pictures that I've taken for the holidays. I found it very discouraging. Any way, this one was a tree that had all kinds of coca cola decorations on it. The picture turned out horrible but I was able to save it by making it look more like a painting.


This one also turned out pretty bad but didn't look too awful when I converted it to black and white.


This is from the get together with my husbands family and his kids. It includes a brand new addition to the family. Wade's daughter Heather had the first grandchild. The proud new parents are 2nd and 3rd from the left in the back and of course there's grandpa up front holding Lydia.


This one is Christmas eve at home with my kids. Too bad Brad had his hat on, you could have seen the new haircut he got ( a Mohawk). He asked me if I liked his haircut and I told him "NO". He said it could have been worse, it could have been red, green or blue....lol


One last one before I go. This one is probably my favorite. This is Rusty, a very talented cat. He belongs to my husband's dad and step mom. I put a barn texture overlay on this one that I got from http://coffeeteaphotography.blogspot.com/2007/09/photoshop-elements-pse-actions-and.html

Thursday, December 18, 2008

Christmas memories

I wanted to share a scrap book page I did recently. The picture is one I got from my cousin not too long ago. The two little cuties dressed in red are yours truly and my cousin Rich.


The kit I used to make this page is called "Christmas memories"


Oh my did you notice that? It says it was designed by ME....lol If you remember some time ago I was talking about a cafe mom group "scrap kit designers" that had a challenge to create your first kit. Well this was the one that I did for that challenge. Of course this isn't really my first kit but I suppose it is where my little hobby started to grow. I would have shown you this one sooner but the challenge spanned out over a couple of months and it actually still isn't over but I thought I would show it to you anyway. I'm also giving it to you as a freebie. My Christmas gift to anyone who happens to stop by.
You can download the freebie HERE

Monday, December 15, 2008

Not what I had planned

I've been trying to get into the habit of doing my blogging on the weekends. I come up with ideas and then break them down into several different posts throughout the weekend. Well this past weekend I just didn't seem to have the strength or ambition to do much of anything. So today I'm just going to post all of the edits that I had meant to do over the weekend.
These first two were pictures I took of the back yard and after some editing I added quotes to them. I'm a bit of a quote junkie


The next two are two versions of the same picture. I took a picture of a little snowman candle lamp I have for a cafe mom group. They had a game where someone posted a picture of something then said what the next person had to post a picture of. (again with the quotes...lol)


and finally the last ones. I caught a squirrel running through my back yard one day so I had to run and get the camera. By the time I got it, I thought he was gone. I was searching around the tree where I thought I saw him run up. I was about to give up when I spotted him in my neighbors yard. I just wish that I had a better zoom on my camera so that I could have got up a little closer to him.


Friday, December 12, 2008

sharing a layout

I may be a little behind here but I just got around to doing a scrap book page with my Thanksgiving pictures. I cheated a little here and used a template. This one came from http://just2morethings.blogspot.com/


I used my own kit to do the page, this was my "Giving thanks" kit. So here it is, us on Thanksgiving day.

A website worth checking out

I stumbled on a website a couple days ago that I think is worth checking out if you are interested in improving you photography skills. It's www.digital-photography-school.com/blog
On this website you will find a forum with subjects like
weekly assignments
critique my pic
How I took it
Technique
There is a tips section which covers subjects on:
tips for beginners
composition
cameras and gear
how to
portrait photography
post production
wedding photography
There are also sections that have information if you are thinking of upgrading your camera or want to make money from your photos.
I haven't gone through the entire website but I've seen enough that I thought it was worth sharing with you.

Clean extractions

Whether you are doing an extraction to put a person or object in a new background or to create an element for a scrapbook kit, you want your extractions to be clean. There's nothing worse than finishing a project, flattening it, saving it and then realizing that you have stray pixels that ruin the final picture.

So how exactly do you get a clean extraction? I thought I was doing pretty good with mine until I had asked for some constructive criticism in one of my cafe mom groups on a scrap book kit I had made. The elements I had made weren't bad but the extracttions needed to improved upon. I got some great advice from RebekahRain a.k.a. statements by Jodi http://www.statementsbyjodi.com/
Here are some things I learned about doing a GOOD job:
1. zoom in really close to get clean edges
2. when you are done erasing everything you want, use your magic wand tool and select outside the subject. Now go to select > modify > expand. I use either 1 or 2 pixels. Next go to select > feather. Again use a value of 1 or 2. From here you can right click, choose select inverse, then layer via copy and then delete your original.
3. Something else that is a good idea to do is to put a colored layer underneath the picture that you are doing the extraction on. As you are doing your erasing stray pixels will be more obvious. If you are erasing a light background then use a dark color or a light color if you are erasing a dark background. You can always play around with your blank color layer to see which one pixels are more obvious on.

Monday, December 8, 2008

Sending you warm winter wishes

I made this with my new kit.
It all began with one little reindeer. After finishing him I was on a roll and started adding a few things here and there. Some of the girls over at cafe mom were making snow globes and I've been wanting to give that a try. I found a tutorial for making one on http://www.escrappers.com/ and this one fit right in with the kit.


This kit would be great for any winter or even Christmas layouts. When you download the kit, let me know what you think. This is kit #7 for me and I don't get a lot of feedback so I'm not sure if they're getting better or not....lol If there's something I can improve on, let me know, I swear you won't hurt my feelings.


to get the freebie click HERE

Sunday, December 7, 2008

Hungry?

I made one of my favorites for dinner tonight, stir fry. Being the camera junkie that I am I took a picture of my plate before I sat down to eat.


I found the recipe for this in a cheap dollar store book a couple years ago. The page has since had something spilled on it and then chewed by the dog, so I've had to just sort of wing it.
If you want to try it out and don't have a recipe of your own, here is mine.

Chicken stir fry
1 boneless skinless chicken breast
1 tbs. cornstarch
1/4 cup water
1/2 cup chicken broth
1/4 cup soy sauce
1/4 cup vegetable oil
frozen stir fry vegetables

Heat oil in skillet on medium high heat. Add chicken and cook 2 minutes or until browned. Remove from skillet Add vegetable to skillet and cook till heated through (or until crisp-tender, whichever you prefer) Return chicken to pan. Combine cornstarch, water, chicken broth and soy sauce. Pour over vegetables and cook 2 minutes or until thickened. Serve over rice.

I realize that this post isn't exactly related to digital photography, editing or scrapbooking but I did throw in a picture. For a change I actually took a picture that really didn't need any adjusting. The only thing I did to this one is crop.

The weather outside is frightful...

...but FREEBIES are so delightful. Yes the weather here today is quite frightful. I suppose it could be worse but 21 degrees that feels like 7 with the wind is bad enough for me. My desktop weather from http://www.weather.com/ has been flashing a weather alert since yesterday. I live in an area that is prone to lake effect snow. If you aren't familiar with what that is, lets just say, it means you're going to be doing a lot of shoveling.

While lake effect snow may not be a good thing for me, it is a good thing for you. If it's snowing and blowing outside what better thing to do than to put together a little freebie for my scrapping friends.


This is just an assortment of 11 elements, all in png format. Great for your Christmas layouts or those last minute cards you need to put together.
You can download the freebie HERE

Saturday, December 6, 2008

Editing options

If you own a computer, chances are you have some kind of editing program. Whether you already have a program or are just starting out, you might find some of these links useful or even fun.

To achieve fun, creative edits you don't even have to download a program. There are three different websites that you can visit.
http://www.dumpr.net/ has a few interesting things you can do with your pictures. The only work involved for you is to simply upload your pictures.
if you want to be a little more involved in creating your masterpiece you can try http://www.lunapic.com/ or if you're into bling then you'll want to visit http://www.blingee.com/

If you're thinking about going the photoshop route www.adobe.com/downloads is the place to visit first. You can download a free trial of either the latest version of photoshop or elements along with a few other programs. One last option is to visit http://www.getpaint.net/ there you can download paintnet free. I've never used the program myself but from what I read and others have said, it has a lot of the same features that you would find in photoshop.

One final note and an extra plug for http://www.blingee.com/ . If nothing else, you've got to check this website out. When I was checking out all these websites this is the one that I hung out at the longest. They have so many cool things you can add to your pictures.

My name is Ann and I'm a photoholic

There I said it. It's true, I just can't get enough of pictures. I love to take them, edit them, look at them, share them. I may even dream about them, but I can't say for certain. I've heard that the first step to recovery is admitting you have an addiction. I have a confession to make though. I am willing to proclaim my addiction but I have no intentions or desire to overcome it.

Today I'm just going to share a few recent pictures with you.

I took this first one because I just loved the way the dark shadows fell across the snow in my back yard.


This was a picture I took of a silk rose. I did the edit for a challenge over at cafe mom. I used the sanded away action from Atomic cupcake


The last one come with a warning. If you know a photoholic, NEVER say to them, "I'm surprised you aren't taking a picture of (insert word here)"...lol When my daughter was over for Thanksgiving, I was taking pictures of various things and she said "I'm surprised you aren't taking a picture of my earring". Hmmm what a great idea, so I did.


Wednesday, December 3, 2008

Christmas card freebies

I put together a set of 4 Christmas cards tonight. All are sized to use on a 1/4 fold card. One is just a generic card (no room for picture) the other 3 are png files with an opening for you to add your own picture


To download the set click HERE
I didn't include a TOU with the set but they are simple, Use them however you like. All I ask is that if you use them for anything other than to make your own greeting cards you give me credit for the work.


Random pictures

Every now and then I like to look back at the pictures that I've taken to see which ones are worth spending the time on to edit. (I have yet to take a picture that doesn't need some kind of tweaking) I like to look back too at all the pictures I've done edits on. Some times when I'm reviewing them, I'll look at a picture and wonder why I thought that edit was worth saving. There are some though, that no matter how many times I look at them, there is something about them that just draws me in. I can't explain what it is or why, it's just one of those things that just is.
Here are a few that always catch my eye. I don't know if I've posted any of these here before or not, so if I have I apologize for repeating myself.

This one, not only am I drawn to the picture, but also the real thing. It's not a very attractive building in itself but something about it made me take this picture. I just love the rustic worn look of the side of the building


This was another one of my boredom pictures. I was taking macro pictures of the top of my coffee table....lol (Don't ask me why I was doing that I can't explain other than I was bored) The table itself is special because my son made it when he was in school. What does a kid do with a coffee table? Give it to his mom of course. Anyway, every time I'm scanning through my edits I always stop on this one a little longer than some of the others.


This is my latest one. I was checking out the snow setting on my camera one day and happened to take this picture. I guess I liked this one because of all the snow that was piled up on top of the bird bath and I just happened to catch the little bird yard ornament in the bottom corner.

Hope you enjoyed my random pictures.

Sunday, November 30, 2008

What in the world

Perhaps it's just my bored, imaginative eye, but I think that this picture resembles a small part of the universe. Earth is standing out in front with another planet looming behind. Beyond that you see the blackness of an infinate universe.

You may be wondering at this point if I've lost my mind. Or maybe you're in awe of my outstanding photographic skills. Another possability could be that you're questioning how I did this.

Well, no, I haven't lost my mind, yet. I may be a little on the looney side sometimes but for the most part I am still in posession of all, if not most, of my marbles. If you were thinking this was a stunning work of photography, I thank you for the compliment, but alas, this was merely a picture taken in a moment of shere boredom. I held the camera over the top of an open can of fish food....LOL (ok so maybe when I did that I was temporarily a candidate for the nut house)

Here's how the whole thing started.
As I said I took a picture from the top of the fish food can. (I really can't believe I'm admitting to this)


-I opened up this picture in photoshop elements 5.
-Duplicated the layer (Layer > duplicate)
-Turned the duplicate layer to black and white (enhance > convert to black and white >urban snapshot)
-changed the blending mode of the black and white layer to exclusion
-I then used the eliptical marquee tool to make a large oval selection.
-I chose select > feather using a value of 200 then select > select inverse
-before filling this selection I created a new layer. On the new layer I right clicked and chose fill selection and chose white for the fill color.
-I changed the vignette layers blending mode to color
-At this point it pretty much looked like the final image except for the corners still had too much white in them so I used the clone tool to carry the black all the way to the edges. (You may be thinking that it would have been easier to just add a black vignette instead of white. It does sound like a better option. However I did try it that way and didn't get quite the same look as I did with the white)

I hope you enjoyed my pictures and mini tutorial. Maybe it even inspired you to take your own boredom pictures to see what you can come up with.

Saturday, November 29, 2008

Stop and have a cup of tea

Some time ago I was introduced to the art of tea bag folding. If you aren't familiar with it, you fold squares of paper and then join them to make medallions. (to learn more you can check out this site http://www.cardsandcrafts.freeservers.com/teabaginst.html ) For a while I was printing out tea bag tiles by the dozens, cutting them out, learning different folds and then using them to make greeting cards. Eventually I moved on to a new creative outlet and the teabags were retired to the craft drawer. That is until the other day, when I got the idea to scan them and use them for scrap booking

This is one of the medallions I rescued from my craft stash


After I scanned and extracted this one it led to 3 more, followed by some related embellishments, and before I knew it I had a whole kit put together. For lack of a better name I simply called it "Tea Time"

The kit includes:
16 papers
1 alpha set (upper case only)
28 embellishments which include
-2 borders (1 tiled and one punched)
-4 bows
-4 buttons
-1 envelope
-1 journal
-1 note paper
-3 paper clips
-1 photo mat
-1 pen
-1 raffia button bow (ready to add on top of a button)
-1 swirly
-1 tea bag
-1 tea cup
-4 tea bag medallions
-1 tea bag tile
-1 word art


So are you dieing to see what it looks like yet? Well then, without further adieu, I present to you, "Tea Time" I loved the combination of warm dark colors blended with the softer pinks.


Now, I could either pour you another cup of tea or you can click HERE to get the download. Stop by again sometime and maybe we'll have coffee.

Monday, November 24, 2008

Bah Humbug and a freebie

Bah Humbug is exactly the way I'm feeling about Christmas right now. Don't get me wrong, I love Christmas. What I'm really disliking right now is what it's turned into. Retailers rushing the holidays through so they can get bigger sales every year, shoppers fighting to be the first one to get the years hottest toy, the mentality that tells people if your really want to show your love and appreciation you have to spend, spend spend (whether you have the money to spend or not).
You could say I'm guilty of rushing the season myself, since I've already posted some Christmas freebies here, and you would be right. I'm also guilty of over indulging my children when they were younger. After so many years of it, and my holiday spirit taking longer to kick in, it's time for me to ignore the unrealistic expectations and focus more on what it's really all about.

I sat down tonight and created some word art that was based on the true meaning of Christmas.


To get the freebie click here

Sunday, November 23, 2008

Sunday part 4 (a freebie)

My final post for today is a freebie. It's called "Tis the season"
It includes 8 papers and 13 elements. I was going to include an alpha set as well but I've discovered that I am not a fan of making alphas. If anyone knows of a quick and easy way to do them, please share your secrets. Enjoy the kit, and I would love to see how you use it. Send me an email or a link to what you've created.


to download click here

Sunday part 3 (a photo edit)

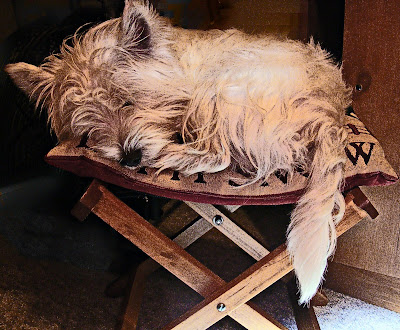
I started out with this picture. Composition wise, I would say it's not so bad. I could be wrong, but I think it follows the rule of thirds. Photographically speaking, it's not so good. I onlyl have a point and shoot camera, no external flash and no special lighting. Therefore, it was in need of a little Photoshop elements magic.


Here is what I did to get the results you will see below.
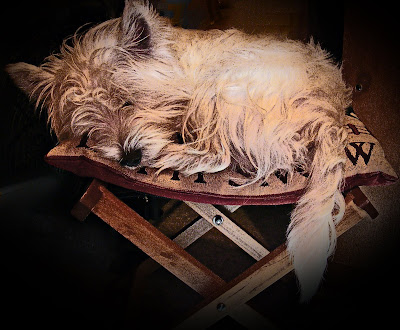
1. Open the picture and run the auto smart fix (enhance > auto smart fix) . In addition I also ran the auto levels and contrast.
2. Adjust Hue/Saturation (enhance > adjust color > hue/saturation) This picture obviously had too much red in it to me so I chose to adjust just the reds first. Then since it was taken inside under an incandescent light it had that yellowish tint so I also lowered the yellows.
3. Unsharp mask (enhance > unsharp mask) the settings I used were amount: 14, radius: 40, threshold: 0
4. Duplicate layer and convert to black and white (enhance > convert to black and white) My version of pse gives options when you select this. I chose the urban snapshot.
5. Duplicate black and white layer and then go to filter > other > highpass. I chose a radius of 7 pixels.
6. Change the blending mode to hard mix and the opacity to 40 and merge down.
7. Change the blending mode of the top layer to luminosity and merge down.


Ahh I like this much better than the original. But, I'm still not quite happy with it. I don't care for the bottom right corner. It's too light in comparison to the rest of the picture. A few more adjustments here.
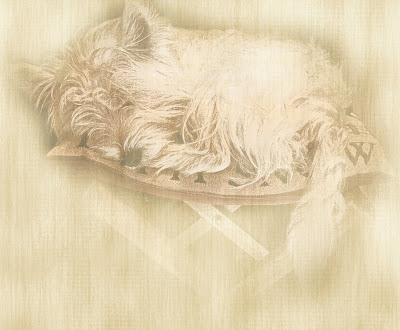
1. select the elliptical marquee tool. I made a large selection over the picture so that just the 4 corners would be affected.
2. Select > Feather and chose a radius of 200
3. Select > inverse
4. create a new layer then right click the mouse and choose fill layer > black. At this point you can adjust the opacity of this layer if you want or leave it as is and merge down.


I was very satisfied with the way this looked but felt like doing just a little bit of experimenting. I took a background paper that I had created for a scrap book kit and placed it on a layer beneath the edit. Then I played around with the blending modes. Then I placed a copy of the background paper above the edit and with a soft edge eraser and the opacity turned down to around 25 I erased the inside so that the dog would show through and finally messed around with the blending mode until I got a look that I was happy with.

And VOILA. Here is my masterpiece.

Sunday part 2 (playing with light)

Some time ago I had seen pictures that someone had taken in the dark using lights. By moving either your camera or the light source you can get some really cool effects. Last night I decided to give it a try. I turned off all of the lights except for some Christmas type lights. I set my camera on the "night" setting and then moved the camera around in different directions while taking the picture. Another way to do it would also be to put your camera on a tripod, use the timer and then you have your hands free to move the light source.


This isn't something that I would hang on my wall but it was fun. Next I think I'll try doing it with the camera on the tripod and see what I come up with that way. Go ahead, give it a try.

Sunday part 1

Yep, that's right, part 1. I have several different things I want to share with you today and I thought it would be best if I broke it down into separate posts.


I came across a website today that I found so entertaining. I'm sure that I could have wasted the afternoon away playing here. You have got to check this one out. Especially if you do any kind of photo editing or scrap booking. The website is BGPatterns I'm not sure about terms of use for any of the patterns you create. They didn't have anything on the website as far as FAQ or TOU.

Here are a few of the patterns I made while I was there.


Head on over there and make some of your own. When you register you can save all your patterns right there on the site. You can also download them to your computer.
Related Posts with Thumbnails